A journey with “Embedded programming with Android”: part 1
Posted by Kristian Golding on November 13, 2019
I purchased the Kindle edition of this book: https://www.amazon.com/Embedded-Programming-Android-Bringing-Scratch-ebook/dp/B013IQGX3A
and since I’m going through the book in 2019, there are a few gaps to bridge.  The first was creating an emulator. I did this via command line, and step 1 was to get a basic Android SDK downloaded. I use Vagrant/Virtualbox for my development, so this was used to set up the SDK
put this here
Once that’s done, I need to configure my emulator to use Android API 15. To get an idea of what I can install, I use the sdkmanager tool to list all the available options:
$ANDROID_HOME/tools/bin/sdkmanager --list
Which gives a bunch of output, but I’m only interested in the android-15 results:
  system-images;android-15;default;armeabi-v7a      | 5    | ARM EABI v7a System Image
  system-images;android-15;default;x86              | 5    | Intel x86 Atom System Image
  system-images;android-15;google_apis;armeabi-v7a  | 6    | Google APIs ARM EABI v7a System Image
  system-images;android-15;google_apis;x86          | 6    | Google APIs Intel x86 Atom System Image
The book says we’ll be developing for arm, and I don’t think I’ll need Google APIs, so Ihoose the armeabi-v7a. I don’t know how this is all going to fly in Virtualbox either, so I yolo by running the following command and accepting license with “y”.
$ANDROID_HOME/tools/bin/sdkmanager "system-images;android-15;default;armeabi-v7a"
Cool.  Now to create an emulator image, right? I don’t have any idea of how to configure it via command line, but I’ll try and feel my way through:
$ANDROID_HOME/tools/bin/avdmanager create avd --name mytestavd --abi default/armeabi-v7a --package "system-images;android-15;default;armeabi-v7a"
Which results in “Error: “emulator” package must be installed!”
Ok, let’s install that (and wait!):
$ANDROID_HOME/tools/bin/sdkmanager emulatorAnd then I try re-running the command to create the avd, this time successfully. I answer “no” to creating a custom hardware profile, as I answered “yes” the first time and didn’t know what to answer for some of the questions. I believe I can play around with this at a later time. Now where did that go?  Find out with this command:
 $ANDROID_HOME/tools/bin/avdmanager list avd

Output:
Available Android Virtual Devices:
    Name: mytestavd
    Path: /home/vagrant/.android/avd/mytestavd.avd
  Target:
          Based on: Android 4.0.3 (IceCreamSandwich) Tag/ABI: default/armeabi-v7a
So, it seems like we may have some basic steps done. More will be done in a part 2 of this post, hopefully in the New Year.
Server performance monitoring with “Netdata”
Posted by Kristian Golding on November 12, 2019
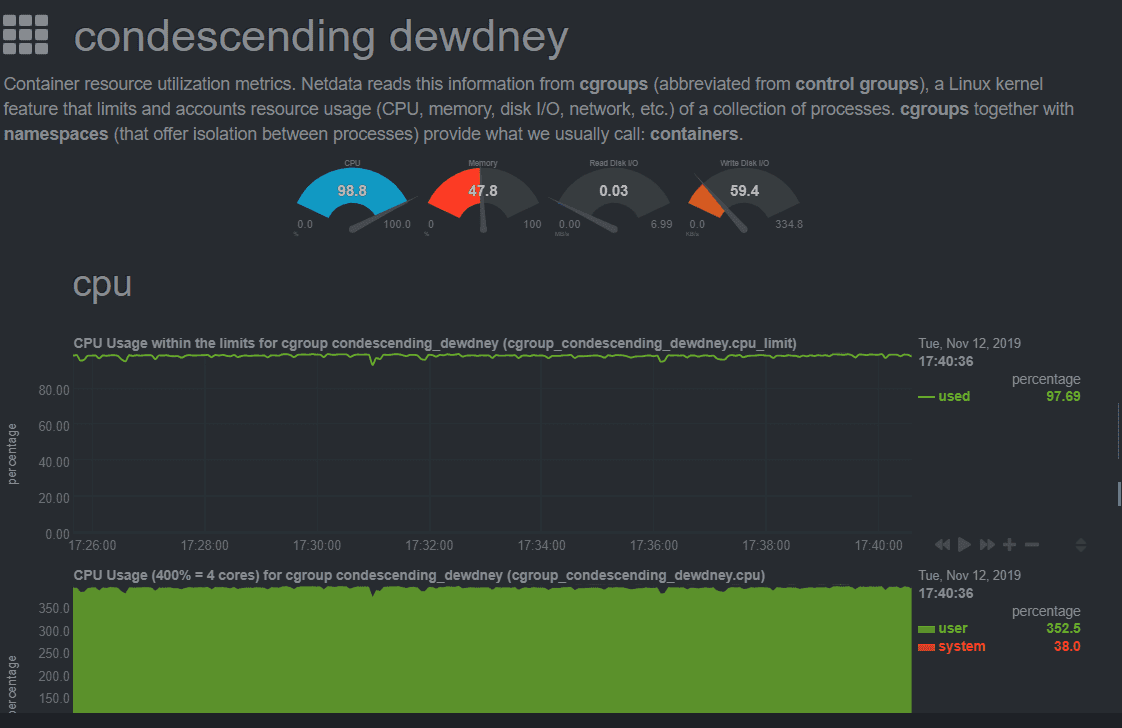
I run a couple of servers at work for my skunkworks projects, and I was trying to find a good monitoring tool to see how much stress I was putting them under. I already use “monit” (https://mmonit.com/monit/), running on a Raspberry Pi, to monitor whether a server (and services running on it) is there at all, but for more detailed monitoring, Netdata (https://github.com/netdata/netdata) was the killer app for me. It’s super easy to install, and once up and running you just go to <servername>:19999 to check the status. If you leave it idle for a while, it’ll stop updating (nice!), which I thought was good because it does provide a metric ton of information. The really nice thing is that because my servers host a bunch of Docker containers, I can see what *each container* is doing. Too awesome.
Example shot for one of the containers:
Moon test shot
Posted by Kristian Golding on August 15, 2019
Testing out a tripod shot of my new 200mm – 500mm telephoto lens with 2x magnification on 1.5 DX crop (~ 1500 mm equivalent)

Adding existing NTFS mount to Linux Mint 19.1
Posted by Kristian Golding on June 17, 2019
I had a Windows machine that had a Vagrant setup on a different drive. When I replaced the Windows partition with Linux Mint, I wanted to have the other drive, already formatted as NTFS and containing my Vagrant workspace, mounted as /vagrant in the Linux machine.
First, I found out the properties of the drive:
sudo fdisk -l
I found it was a device under /dev/sdb1 and formatted as type HPFS/NTFS/exFAT. Now to open the fstab file
sudo vi /etc/fstab
Then add this line:
/dev/sdb1 /vagrant ntfs defaults,uid=1000 0 0
Changes to that file can then be applied with “sudo mount -a” (except I believe with partitions marked as ‘noauto’), or in my case, a reboot.
I’m quite sure there is some optimizing that could be done there, but I’ll update this later if I find some.